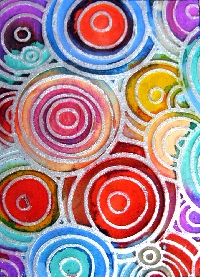
TPD Technique ATC - Painted Tin
Launch gallery slideshow

| Group: | The Paper Dragon |
| Swap Coordinator: | dobie256 (contact) |
| Swap categories: | Art Artist Trading Card (ATC) |
| Number of people in swap: | 7 |
| Location: | International |
| Type: | Type 3: Package or craft |
| Last day to signup/drop: | January 6, 2014 |
| Date items must be sent by: | January 21, 2014 |
| Number of swap partners: | 2 |
| Description: | |
|
Here is a new technique I have been playing with and really enjoying. It is very similar to this Tim Holtz technique. But in this new technique gesso is used and instead of having translucent colors you get a rich opaque "painted tin" appearance. Please read the swap descriptions in the link above because there is a very long very informative discussion on flashing tape there. Step 1: Cover some card stock with flashing tape (or sticky backed foil). I have found it easier to cover paper that is a bit larger/wider than the tape, do the technique to completion, then trim to ATC size. But using 2.5 x 3.5" papers to start with is fine too. Step 2: Emboss your design. Pick an overall design with lots of detail! You want lots of gutters to hold the inks and lots of raised foil lines to wind up being silver. Next apply an even coat of plain white gesso (not so thick as to lose detail but thick enough to completely cover the shiny foil surface). Step 3: Start applying your colors of alcohol ink. Apply tiny drops directly to the surface of the paper. You can slightly manipulate the flow with a paintbrush, Q-tip, or tooth pick. Do not stress and try to get it perfect. You do not have to "stay in the lines!" Step 4: If you think you just have a big muddy mess at this point you are probably right on track! Here is an important trick about alcohol inks. The last ink you add becomes dominant! So say at the end here you want a couple of the centers to be lighter or brighter. Drop a light ink (say yellow) into the center, give it a second or two, then blot with a paper towel. Your center will be lighter and brighter -- even if you dropped the yellow over a dark color. :) Now comes the magic. Carefully sand the surface of your design. Go slowly and be careful not to tear the paper -- even though it is covered with foil it is somewhat fragile. You want to remove the alcohol ink and gesso from the surface of all the raised design lines. Once done with that, thoroughly wipe the surface with a slightly damp paper towel to remove all dust. Step 5: Now comes the best part! Carefully sand the surface of your design to remove all of the inks from the design lines. Go slowly and carefully here -- even with a foil covering the embossing is somewhat delicate. Just keep sanding until your design is revealed. When you are satisfied go over the surface with a **slightly* damp paper towel to remove all of the dust. Step 5 -- Optional ways to finish your design. I like to leave my lines silver but sealed so that they won't tarnish over time. So I seal with one thin coat of glossy Modge Podge. You can leave it be and let it tarnish -- on some designs that might actually be preferable. You can also do what I described in the original linked swap. If you lightly swipe the surface of the design with jet black glossy accents, then wipe it off, the silver gets an almost pewter looking finish to it. I am leaving a very long lead time before deadline on this swap so participants will have plenty of time to play with this technique. (I hope everyone gets some studio time over the holidays this year). I have done 4-5 different designs with this technique and really have enjoyed both the process and the results. So have fun! Requirements 1 ATC to each of two partners (2 ATCs) total Technique - Painted Tin Theme - Sender's Choice Rating requirement of 4.95, no ones, no recent or unexplained 3s. | |
- Info:
- Home
- |
- About
- |
- Forum Rules
- |
- Terms of Use
- |
- Press
- |
- Advertising
- |
- Blog
- |
- Graphics & Stuff
- Help:
- New User Info
- |
- FAQ
- |
- Group Info
- |
- Glossary
- |
- Forums
- |
- |
- Contact Admin

